
As a student, you may have been asked by your college or university to create a MindGenius Online account, either for an assignment or to use as a tool to better your time management. Don’t worry, the process is simple for both a student and an admin.
Step 1: Create MindGenius Online account
To connect your account to your university, firstly you need to sign up using your educational email. This will initially be set up as a free trial, but once you sync your account to your university you will have a full license with all product benefits.
Once you’ve signed up, you’ll receive a verification email. All you need to do is verify your email through a link that we send to you (if you don’t receive a verification email, please check your spam folder!).
Step 2: Request to sync your account with your college or university.
Once you have verified your MindGenius Online account, simply log in. If your university has an account with us, your educational email will be recognised and you’ll be asked if you want to join your university’s MindGenius account. All you have to do is request to join.
Step 3: Admin approval and confirmation
Once you have requested to join your college or university, it is then down to your college or university to approve your join request. They will be notified via email or through the MindGenius Online page under “Organisational Admin” portal. Once you have been approved you will have the full version of the product and your very own license.
What about Admins?
Registering as an admin has never been easier. You can either watch the video below, or follow our step-by-step guide.
Step 1: Sign up to MindGenius Online using either our website or our sign-up link.
Step 2: Enter your email address, receive a verification email and then verify your email.
Step 3: Enter all relevant information to your profile such as your name and setting up a password. Under “organisation name” please enter the name of your college or university.
Step 4: Once you have fully registered, email us via info@mindgenius.com and we will convert your account from trial to paid and add enough user licenses to enable you to rollout your licenses across your college or university.
Step 5: Add as many students or faculty as your licenses allow. You can upload names using our bulk upload feature, allowing you to copy and paste emails in and press invite (pictured below).
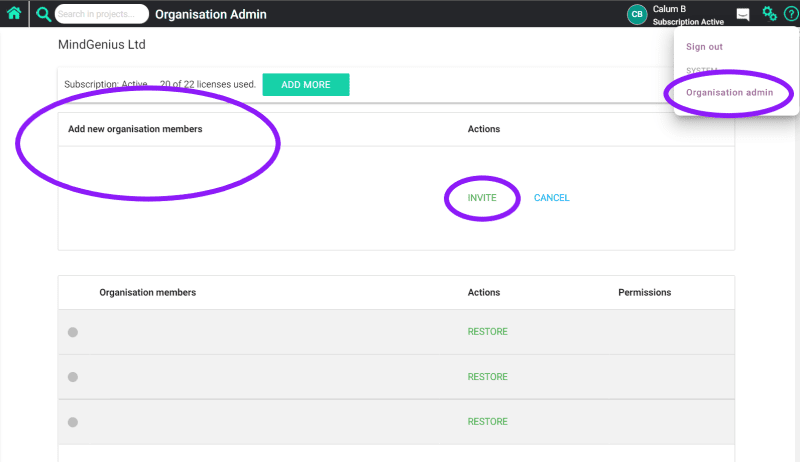
To upload your students and faculty to your organisation, go to Users in the left-hand menu, or “Settings > Organisation Admin” then select the text box underneath “add new organisation members” and simply copy and paste, then select invite.
If you have any questions regarding MindGenius Online or have feedback for us., You can do so via the form below.